Bergmann Lumber
Related Articles
In the realm of construction and building projects, one fundamental element that remains quintessential is the installation of wood studs. These wooden frames serve as a backbone for various structures, providing stability and support to walls, ceilings, and floors. To grasp the intricacies involved in this process, it is crucial to delve into the world of lumber and building materials. For instance, consider a hypothetical scenario where an aspiring homeowner embarks on a mission to remodel their living space by converting an open floor plan into separate rooms using wood studs. By understanding the properties of different types of lumber and selecting appropriate building materials, individuals can successfully navigate through the complexities associated with installing wood studs.
To commence any project involving wood studs, it is imperative to gain knowledge about lumber varieties available in the market. Each type possesses distinct characteristics that determine its suitability for specific applications within construction projects. For example, softwoods like pine or fir are commonly used due to their affordability and ease of workability. On the other hand, hardwoods such as oak or maple offer enhanced durability and strength but may come at a higher cost. Additionally, engineered woods like plywood or laminated veneer lumber (LVL) provide alternative options that exhibit increased resistance against warping or shrinking compared to solid wood counterparts .
Furthermore, it is crucial to consider the size and grade of the lumber when selecting materials for wood studs. The most common sizes for studs are 2×4 or 2×6, with the choice depending on factors such as building codes and structural requirements. Grades of lumber denote the quality and appearance, with higher grades having fewer knots and defects. It is advisable to choose a grade that meets both aesthetic and structural needs.
Once the appropriate lumber has been selected, the next step involves actually installing the wood studs. Here are some steps to guide you through the process:
-
Measure and mark: Begin by measuring and marking where each stud will be placed on the wall or floor according to your desired layout. Typically, studs are spaced at either 16 inches or 24 inches on center.
-
Cut the studs: Using a saw, cut the lumber to the desired length based on your measurements. Ensure that each cut is square (90-degree angle) for proper installation.
-
Attach bottom plate: Secure a bottom plate along the floor using nails or screws. This plate acts as a base for attaching each wood stud.
-
Install vertical studs: Position each stud vertically against the bottom plate, ensuring they are plumb (level vertically). Use a level tool to ensure accuracy and secure each stud to both the bottom plate and top plate (horizontal piece at ceiling height) using nails or screws.
-
Add blocking if necessary: In certain cases, additional blocking may be required between studs for added support or to accommodate fixtures like electrical outlets or plumbing pipes.
-
Repeat steps for additional walls: If you’re constructing multiple walls, repeat steps 1-5 accordingly until all walls have been framed with wood studs.
Remember to consult local building codes and regulations before undertaking any construction project involving wood studs as there may be specific guidelines in your area regarding spacing, materials used, fire safety measures, etc.
In conclusion, understanding the different types of lumber available and selecting appropriate building materials are crucial steps in installing wood studs for construction projects. By following proper measurement techniques and employing accurate installation methods, individuals can successfully navigate through the complexities associated with framing walls using wood studs.
Understanding the Different Types of Wood for Studs
When it comes to installing wood studs, one must first understand the different types of wood available. This knowledge is crucial in order to make an informed decision about which type of wood is most suitable for a specific project. Let us consider the example of constructing a residential home. In this case, selecting the right kind of wood for the studs can significantly impact not only the structural integrity but also the overall durability and aesthetic appeal of the building.
To begin with, let’s explore some common options when it comes to choosing wood for studs:
- Softwood: Softwoods such as pine and fir are commonly used due to their availability and affordability. These woods possess excellent load-bearing capabilities while still maintaining flexibility, making them ideal for framing structures.
- Hardwood: Although less frequently used than softwoods, hardwoods like oak or maple offer superior strength and resistance to wear and tear. They are often chosen when additional stability or longevity is required.
- Engineered Wood Products (EWPs): EWPs are composite materials made from various fibers combined with adhesives under high pressure and temperature. They provide consistent performance characteristics and have gained popularity in recent years due to their sustainability features.
- Treated Wood: For projects that involve exposure to moisture or potential insect infestation, treated wood may be preferred. It undergoes a special treatment process that enhances its resistance against decay and pests.
Now let’s delve into how these different types of wood compare in terms of four key factors:
| Factor | Softwood | Hardwood | Engineered Wood Products (EWPs) | Treated Wood |
|---|---|---|---|---|
| Strength | Good | Excellent | Varies depending on product | Varies depending on treatment |
| Durability | Moderate | High | Consistent | Enhanced through treatment |
| Cost | Affordable | Expensive | Varies depending on product | Moderate to high |
| Environmental Impact | Sustainable | Depends on sourcing | Varies depending on product | Requires chemical treatment |
In conclusion, choosing the right type of wood for studs is essential in ensuring a successful construction project. By considering factors such as strength, durability, cost, and environmental impact, one can make an informed decision that aligns with both practical and ethical considerations. With this understanding of different wood options, let us now move on to preparing the work area for stud installation.
Transition to next section: Now that we have explored the various types of wood available for studs, it is important to prepare the work area before proceeding with their installation.
Preparing the Work Area for Stud Installation
Now, let’s delve into the crucial step of preparing the work area before installing these wooden supports.
Imagine you have just purchased a new home and are eager to convert one of the rooms into a cozy study. Before beginning your stud installation project, it is essential to prepare the work area adequately. This involves several key steps:
- Clearing out debris: Start by removing any existing furniture or items from the room to create a clean and unobstructed workspace.
- Measuring and marking: Use a measuring tape and pencil to mark where each stud will be placed along both walls that will support your bookshelves and desk.
- Checking for electrical wires or pipes: Prior to drilling or nailing, ensure there are no hidden electrical wires or pipes in the wall cavities using an electronic stud finder.
- Gathering necessary tools: Gather all required tools such as a drill, level, hammer, nails, screws, and safety equipment like goggles and gloves.
Once you have completed these preparatory steps successfully, you can proceed confidently with the installation process.
To summarize:
- Clear out debris from the room
- Measure and mark where each stud will be placed
- Check for electrical wires or pipes within the walls
- Gather all necessary tools
Remember that thorough preparation is integral to achieving a successful outcome when working with wood studs. In our next section on “Measuring and Marking Stud Placement,” we will explore this process further without delay.
Measuring and Marking Stud Placement
Preparing the Work Area for Stud Installation is an essential step in ensuring a successful and efficient installation process. Now, let’s move on to the next crucial phase: Measuring and Marking Stud Placement. To illustrate its importance, let’s consider a hypothetical scenario where you are constructing a new interior wall in your home.
When measuring and marking stud placement, accuracy is paramount. Begin by using a tape measure to determine the desired height of the wall. For instance, if you want the wall to reach 8 feet from the floor, mark this measurement at various points along the adjacent walls using a pencil or chalk line. This will serve as a reference point for later steps.
Next, it is crucial to establish proper spacing between studs. The standard practice is to place them every 16 inches on center (OC) or 24 inches OC, depending on local building codes and structural requirements. Creating consistency with these measurements will ensure that your wall offers adequate support and stability once completed.
To facilitate accurate stud placement, consider utilizing a level or laser level. These tools can help you achieve straight lines both horizontally and vertically while marking locations for each individual stud. By maintaining precise alignment during this stage, you will lay down a solid foundation for attaching drywall or other finishing materials later on.
In summary, measuring and marking stud placement requires precision and attention to detail to achieve optimal results when installing wood studs within an interior wall structure. By accurately determining the desired height of the wall, establishing proper spacing between studs based on industry standards, and utilizing leveling tools effectively, you can ensure that your construction project progresses smoothly towards completion.
Moving forward into our next section about “Cutting and Installing Wood Studs,” we will delve deeper into the practical aspects of preparing wooden studs for installation while exploring various cutting techniques necessary for achieving seamless integration within your structure.
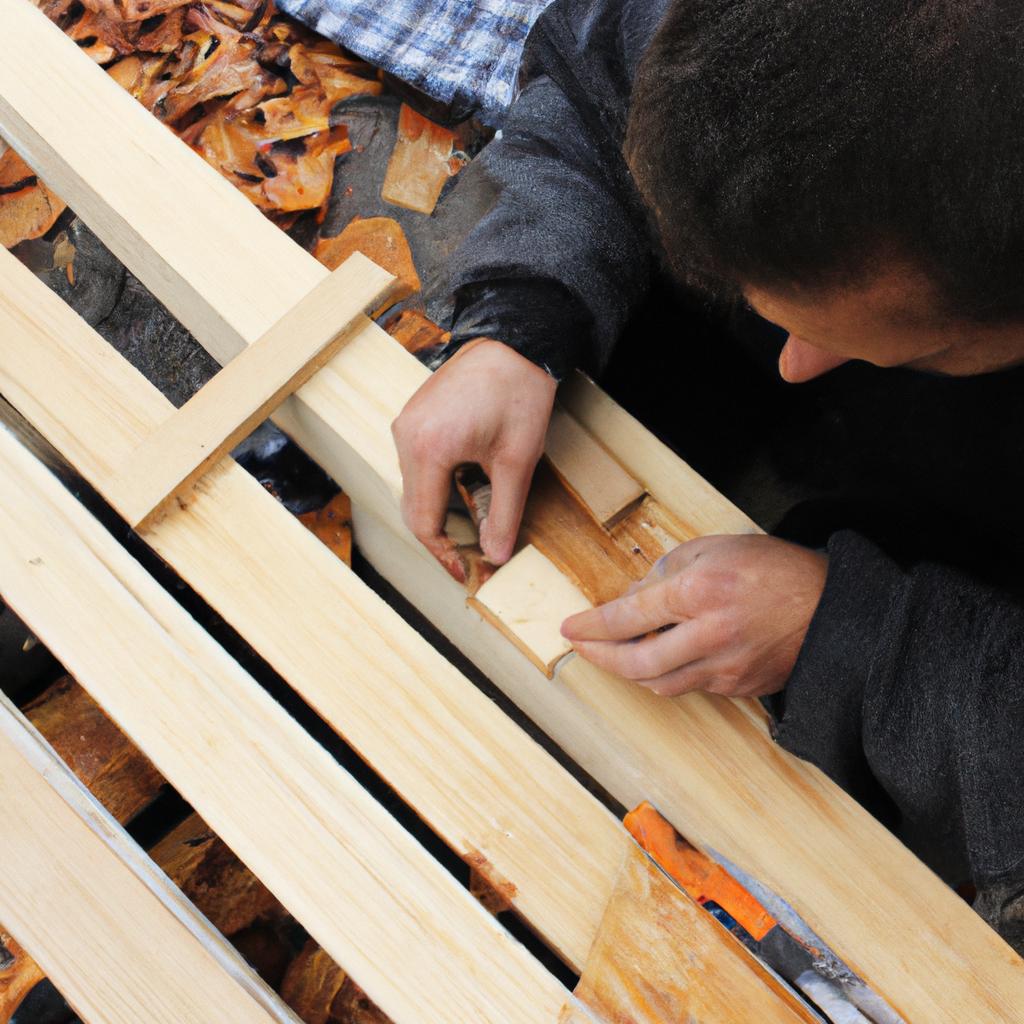
Cutting and Installing the Wood Studs
Building upon the accurately measured and marked stud placements, we now move on to the crucial step of cutting and installing wood studs. This section will provide you with a comprehensive guide on how to effectively complete this task.
To better understand the process of cutting and installing wood studs, let’s consider an example scenario. Imagine you are renovating your home office space into a cozy reading nook. The first step is to determine where the walls need reinforcement by measuring and marking stud placement. Once that is done, it is time to cut and install the wood studs.
Cutting Wood Studs:
Before proceeding with cutting, ensure that you have all necessary safety equipment like goggles and gloves in place. Here are some key steps to follow when cutting wood studs:
- Measure twice, cut once: Double-check your measurements before making any cuts to avoid mistakes.
- Use appropriate tools: Utilize a circular saw or handsaw for precise cuts along the marked lines.
- Mindful guidance: Maintain control over the saw while applying gentle pressure to ensure accurate results.
- Smooth out rough edges: After cutting, use sandpaper or a rasp file to smoothen any jagged edges for easier installation.
Installing Wood Studs:
Now that you have precisely cut wood studs ready for installation, here’s how you can proceed:
| Step | Procedure |
|---|---|
| 1 | Positioning: Place each stud vertically against the wall at their respective locations according to earlier markings. Ensure they align firmly with both top and bottom plates. |
| 2 | Securing: Attach one end of each stud securely either by toenailing them (nailing diagonally) or using metal connectors designed specifically for securing wooden members together. Repeat this process until all studs are properly secured in place. |
| 3 | Leveling & Straightening: Using a level, check each stud for plumb (vertical alignment) and adjust if necessary. Additionally, ensure the studs are straight by aligning a straightedge against their edges. |
| 4 | Spacing: Maintain consistent spacing between adjacent studs as per local building codes or project requirements. This is typically around 16 inches on center, but it may vary depending on your specific needs. |
With the wood studs securely in place, we can now move forward to the next crucial step of securing them firmly for long-lasting stability.
Securing the Wood Studs in Place
Section H2: Securing the Wood Studs in Place
After cutting and preparing the wood studs, it is now time to securely install them into place. Understanding the proper techniques for securing wood studs will ensure a sturdy framework that can support various construction projects. Let’s take a look at how to effectively secure wood studs using industry-recommended methods.
Example: Imagine you are building a partition wall in your home office. To create separation between two areas, you need to install wood studs vertically along the floor and ceiling surfaces. By properly securing these studs, you can ensure stability and durability for your partition wall.
To properly secure wood studs, follow these steps:
-
Marking the stud locations: Begin by marking the positions of each stud on both the top and bottom plates according to your design plans. Use a tape measure or square tool to accurately mark these locations along with corresponding numbers or labels.
-
Nailing the studs: Once marked, position each wood stud vertically against its designated location on either the top or bottom plate. With precision, drive nails diagonally through the sides of each stud into the adjoining plates. This method creates stronger connections than driving nails straight through.
-
Spacing considerations: Ensure appropriate spacing between adjacent studs by referring to local building codes or project specifications. Generally, studs should be spaced 16 inches apart center-to-center within walls; however, this may vary depending on load-bearing requirements or other factors specific to your project.
-
Checking alignment: Regularly check that each installed stud is plumb (vertically aligned) and level (horizontally aligned). Adjust as necessary before proceeding further, ensuring an even framework throughout.
- Increased structural integrity
- Enhanced safety measures
- Efficient installation process
- Professional-looking end result
Table example:
| Advantages | Disadvantages | Tips | Tricks |
|---|---|---|---|
| Provides stability and support | Requires careful measurement | Use a stud finder to locate existing studs before installation | Pre-drill holes for easier nail insertion |
| Ensures durability of construction projects | Potential risk of damaging the wood during nailing | Utilize clamps or braces to hold the studs in place temporarily | Gradually increase pressure when driving nails to avoid splitting the wood |
| Creates a straight framework for walls | Time-consuming process | Double-check measurements before securing each stud | Consider using screws instead of nails for added strength |
With the wood studs securely fastened, it’s important to ensure that they are plumb and level. Checking for plumbness and levelness will help maintain structural integrity throughout your project.
Checking for Plumb and Level
Having understood the process of preparing and cutting wood studs, we now move on to securing them in place. Let’s consider a hypothetical scenario: You have constructed a new interior wall frame using 2×4 wood studs, and you are ready to attach it to an existing structure. The following steps will guide you through this crucial phase.
Firstly, ensure that the bottom plate is securely fastened to the floor or subfloor using appropriate anchoring methods such as nails or screws. This provides stability for your wall frame and prevents any shifting during installation. Once the bottom plate is secured, position each individual stud vertically along the line where they will be installed. Use a level to ensure that each stud is plumb (perfectly vertical) before proceeding.
Next, one common method to secure wood studs is by nailing them into place. Using framing nails specifically designed for structural applications, drive two nails at opposing angles near each end of the stud. This diagonal placement helps prevent splitting while providing strong holding power. Remember always to check for plumbness after driving each nail.
To further enhance the strength and stability of your wall frame, consider adding additional supports known as cripple studs between full-height studs near openings like windows and doors. These shorter studs provide extra reinforcement and help distribute weight more evenly across the frame.
In summary:
- Securely anchor the bottom plate to ensure stability.
- Ensure each stud is plumb before nailing them into place.
- Consider adding cripple studs near openings for added support.
Now that we have explored how to secure wood studs in place let us move on to our next section – Checking for Plumb and Level – which ensures accuracy in construction alignment throughout your project.